
Trucks carry your recyclables to enormous facilities that can be as large as four football fields! There, the waste moves along conveyor belts as machines and people work together to sort the items. At the end, bundled items are ready to be turned into something new. Here’s how one of these facilities, called the Exchange, in Chicago, Illinois, works.
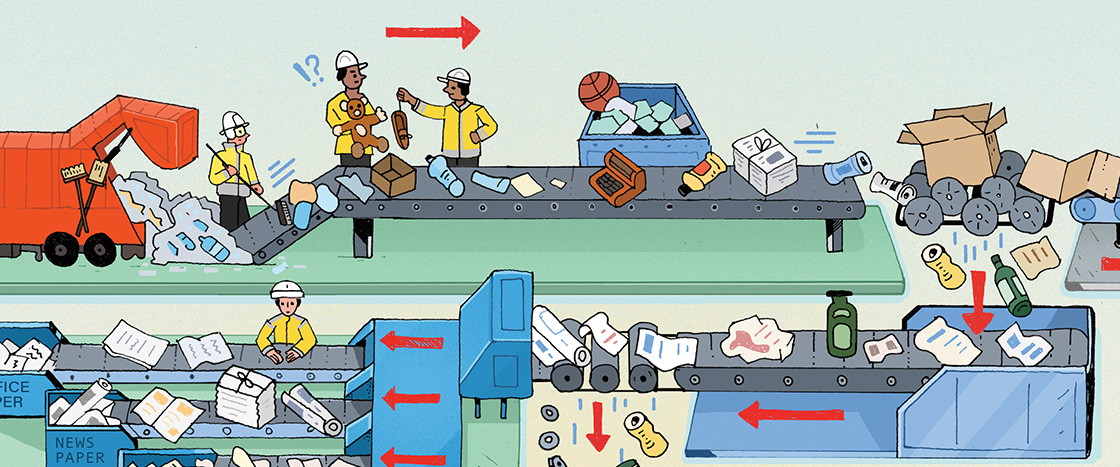
Illustration by Maxim Usik
Inside a Recycling Center
Learn how a recycling facility works
By Karina Hamalainen | Illustrated by Maxim Usik
From the March/April 2025 Issue
Other Focus Areas: Measurement & Data
Standards
UNLOADING
Trucks dump recyclables in the delivery area, where they get shoved onto a conveyor belt.
PRESORTING
Items move along the belt. Workers remove nonrecyclable trash—like shoes and plastic bags—that could jam the machines.
CARDBOARD
Rows of spinning rubber discs push large pieces of cardboard over the top. Smaller objects, like bottles and cans, fall to a lower level for further sorting.
CONTAINERS
Screens separate paper products from bottles, jars, and cans. Those containers fall through. Paper continues on to be sorted.
PAPER
Paper is separated into three groups: office paper, newspaper, and mixed paper, like magazines.
STEEL
A strong spinning magnet lifts steel objects off the conveyor belt and drops the steel into a container.
GLASS
A set of turning discs breaks glass recyclables. The pieces fall into a container.
ALUMINUM
A machine creates an electric current, or flow of electricity, that launches aluminum cans over a gap in the conveyor belt. Plastic items fall through the gap.
PLASTICS
A scanner shoots a beam of infrared light, low-energy light invisible to humans, to identify the different types of plastic. A jet of air shoots lightweight plastics that are easier to recycle (those with a 1 or 2) onto a separate conveyor belt.
COMPACTING
Last, each sorted material goes through a machine called a baler. The baler tightly packs the recyclables into solid rectangular bricks. Companies can buy the bales and use them to make new goods.
What differences in the recyclable materials help the machines sort them?
video
(2)
video
(2)
Games
(1)
Activities
(15)
Question & Answer Sheets
Skills Activities
Vocabulary Kit
Your Literacy Kit
Answer Key
(1)
Step-by-Step Lesson Plan
1. PREPARE TO READ (20 minutes)
Activate and explore prior knowledge about recycling with a video and a trivia game.
- Hold up your classroom garbage can. Discuss what’s inside and ask students: What do you think will happen to it?
- Play the video “What Happens to Our Trash?” Ask: Why is recycling important? (It allows some unwanted materials to be reused instead of wasted and thrown in a dump.) Discuss what else students know about recycling.
- Play the online game “Test Your Recycling Knowledge!” as a class. Read each question aloud and have students give a thumbs-up for yes and thumbs-down for no. Enter the answer with the most votes to see if it is correct. Discuss any answers that surprised students.
2. READ AND SUMMARIZE (25 minutes)
Read the article and paraphrase new information about recycling.
- Write this prompt on the board: “Wow, I didn’t know that . . . !” Tell students to look for information that is new to them as you read the article together. Read the article aloud, stopping every few paragraphs. At each pause, have students turn and talk about new information they learned, beginning with their response to the prompt.
- Read the paired text, “She’s Taking Action Against PLASTIC!,” about Madhvi Chittoor. Discuss the actions Madhvi took to help reduce the use of plastics in her community. Then break each action into smaller steps. (e.g., To send a letter to her school district, Madhvi first researched solutions, then determined who could make the changes.)
- Have students use the article as a reference as they complete the Quick Quiz. Discuss answers as a class.
3. RESPOND TO READING (60 minutes)
Design a system to separate four items for recycling.
- Play the video “Follow That Bottle.” Tell students they’re going to get another perspective on recycling systems. Project the accompanying infographic, “Inside a Recycling Center” (pp. 18-19) while students follow along in their magazines. Walk students through the steps, the captions, and the visuals. Discuss how differences in the properties of the materials make the sorting system possible.
- Preview the Plan a Recycling System engineering design challenge. Discuss how to find an item’s longest measurement, and classroom expectations for using the electric fan in the activity. Distribute materials and allow students to work in small groups. Afterward, reconvene and have groups present their designs. Discuss similarities and differences between student designs and actual recycling facilities.
Text-to-Speech